Elastic Kubernetes Service (EKS)

How to Deploy Doubleword Inference Platform in AWS EKS Table of Contents
- Prerequisites
- Step 1: Set Up an EKS Cluster
- Step 2: Add a Compute Node Group
- Step 3: Connect to the Cluster
- Step 4: Configure the GPU Driver
- Step 5: Prepare the Namespace and Secrets
- Step 6: Deploy the Doubleword Inference Platform Using Helm
- Step 7: Test and Validate the Service
This guide walks you through deploying the Doubleword Inference Platform in AWS EKS. As an example, we will deploy a llama3-8b model with an embedding model jina-v2-code-embed
Prerequisites
Ensure you have the following:
- Access to the AWS EKS Console.
- AWS CLI installed and configured.
- kubectl: For interacting with the Kubernetes cluster.
- helm: For deploying Helm charts.
Step 1: Set Up an EKS Cluster
-
Create the EKS Cluster
- Follow the step-by-step configuration guide provided in the console. For this tutorial make sure to pick 'Custom Configuration' and turn off 'EKS auto mode'.
- When prompted, create an IAM rule as AWS recommends.
- Important: In Step 4 (Add-ons), enable the Amazon EBS CSI Driver by toggling it on. This is required for EBS volume support. Otherwise, use the AWS defaults (you can turn off the metrics server if you wish).
-
Wait for Cluster Creation
- Cluster creation may take some time. Once completed, proceed to add a compute node group and configure the GPU driver.
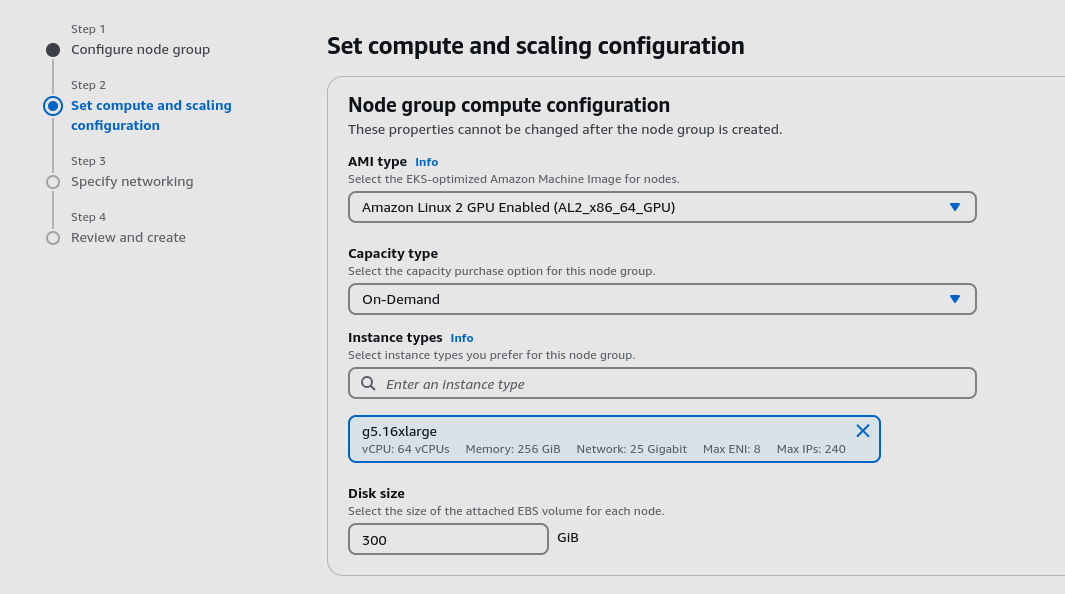
Step 2: Add a Compute Node Group
-
In the EKS Console, create a Compute Node Group with the following configuration:
- Instance Type:
g5.16xlarge(1 x A10 GPU). - Scaling:
- Minimum:
0 - Maximum:
3
- Minimum:
- Instance Type:
-
After completing the setup, your node group should look like this:

Step 3: Connect to the Cluster
-
Open your terminal and connect to the cluster:
- Replace
aws-takeoff-clusterandeu-west-2with your cluster name and region.
aws eks update-kubeconfig --region <your-region> --name <your-cluster-name> - Replace
-
Successful connection will display a message like:
Added new context arn:aws:eks:<your-region>:<account-id>:cluster/<your-cluster-name> to ~/.kube/config
Step 4: Configure the GPU Driver
-
Deploy the NVIDIA device plugin to enable GPU support:
kubectl create -f https://raw.githubusercontent.com/NVIDIA/k8s-device-plugin/v0.17.0/deployments/static/nvidia-device-plugin.yml -
Verify GPU availability in the nodes:
kubectl get nodes -o=custom-columns=NAME:.metadata.name,GPU:.status.allocatable.nvidia\.com/gpu
Step 5: Follow the Takeoff-helm installation instructions
See here, using the provided eks overrides.
Step 6: Test and Validate the Service
-
Port-Forward the Service
-
Forward the service port to your local machine:
kubectl port-forward service/takeoff-controller-svc 3000:3000 3001:3001 --namespace takeoff
-
-
Access the Frontend
- Open your browser and navigate to:
http://localhost:3000for the main frontend.http://localhost:3001for the management frontend.
- Open your browser and navigate to:
-
Validate the Model with a Test Request
-
Use
curlto send a request to the service and verify the model is working:curl -X POST http://localhost:3000/generate -N \
-d '{"text": ["How are you?"], "consumer_group": "generate"}' \
--header "Content-Type: application/json" -
If successful, the model should return a response confirming it is loaded and functioning.
-